How to Use Meta's Facebook Business Manager (Updated for 2024)
At first glance, Facebook Business Manager might seem unnecessary to your toolkit. With Facebook Ads Manager, Insights, and Audience Analytics available within the regular Facebook interface, why learn an entirely new platform?
Well, here's the scoop: Facebook Business Manager brings all these tools together in one place. This means no more juggling between different tabs and platforms. You'll have a centralized hub to manage all of your marketing assets, including Pages, ad accounts, and team members. The result? Less juggling, improved team collaboration, and a better overview of your Meta assets and performance.
What is Facebook Business Manager (aka Meta Business Manager)?
Facebook Business Manager, also known as Meta Business Manager, lets you manage your Facebook Pages, ad accounts (including Instagram), and other assets all in one place. While it might seem a bit overwhelming initially, businesses quickly see the value in its extensive features, settings, and options. Once you get the hang of it, Business Manager becomes an all-in-one solution for efficiently managing your online Meta presence and advertising efforts.
With this tool, you can:
- Assign or remove roles and permissions for agencies and social media managers.
- Get detailed metrics on all your ads, like engagement and reach.
- Create and manage product catalogs.
- View, edit, or delete audiences and events.
If you're running multiple campaigns and managing dozens of pages, Facebook Business Manager can really streamline your efforts. It's the perfect tool for keeping an eye on and optimizing all your business assets on Facebook.
Meta Business Manager Benefits
Below are the primary reasons businesses of all sizes love using Meta Business Manager:
- Centralized Control: Brings all your marketing assets under one roof, so no more jumping between platforms to access Pages, ad accounts, or team members.
- Improved Collaboration: Easily assign roles and permissions to collaborate with team members or agencies without giving them full control over your business's Facebook presence.
- In-depth Analytics on Ads and Organic Content: Check essential KPIs like engagement and reach across all your ads in one place, and track your organic content's performance, such as posts and stories on your pages.
- Business Page Analytics: Discover how your audience is engaging with your business page, including likes, followers, and reach.
- Product Catalog Management: Easily create and manage product catalogs for your e-commerce business. Showcase products on Instagram Shopping or set up Dynamic Ads for Facebook.
- Custom Audience Creation: Create custom audiences based on various criteria, allowing for more targeted advertising and better ad performance.
Overall, Facebook Business Manager offers a more organised, efficient, and secure way to manage your online presence and advertising efforts on Facebook.
What's the Difference Between the Facebook Ads Manager and Facebook Business Manager?
Marketers and businesses, especially those new to Facebook advertising, often start with Ads Manager. After all, it helps you track and manage ads—so why bother with a separate platform?
However, Facebook Business Manager offers much more than ad management. It consolidates all your marketing assets, from videos on your Facebook page to the ad campaigns you're running. You can also install pixels, add product catalogs to Facebook shops, and more.
In contrast, Facebook Ads Manager is solely an ad management tool. It's where you create and edit individual ads and analyze their performance. Unlike Business Manager, Ads Manager doesn't provide access to your business page, product catalogs, or other assets.
While many choose Ads Manager for its simplicity, top Facebook advertisers know ads are only half the battle. Effective Facebook marketing requires a comprehensive understanding of your audience, creative assets, and overall business strategy. Business Manager equips you with all the necessary tools to achieve that.
Step 1: Create a Facebook Business Manager Account
As with all major social media platforms, Facebook frequently updates its interface. The following steps are current as of June 2024, reflecting the increasing integration between Business Suite and Business Manager.
- Go to business.facebook.com..
- Log in with either your Facebook or Instagram account.
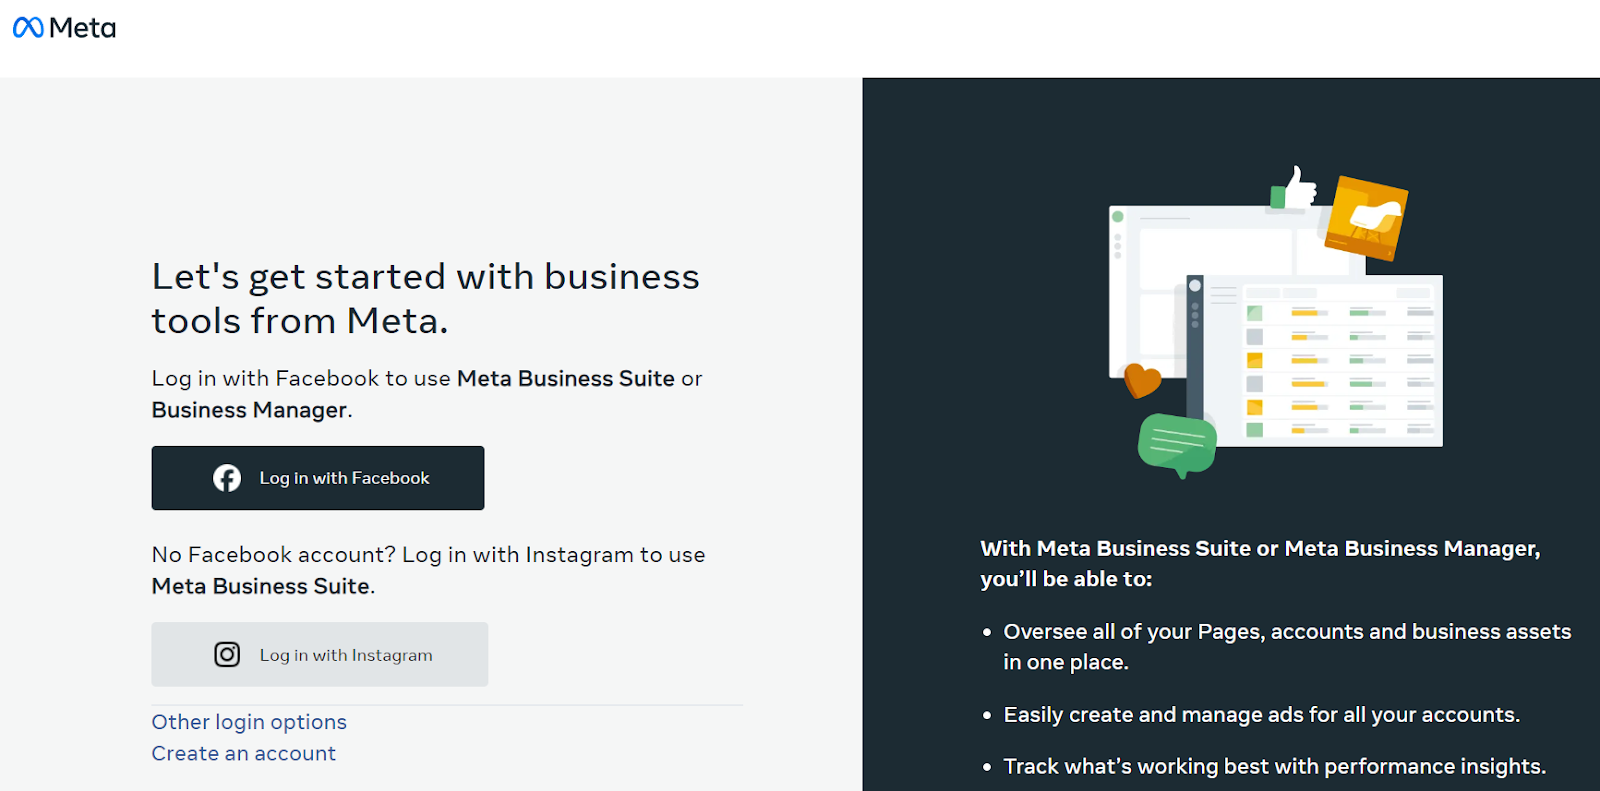
- You'll be taken to the Meta Business Suite.
- Under your account, click 'Create a Business Account.'
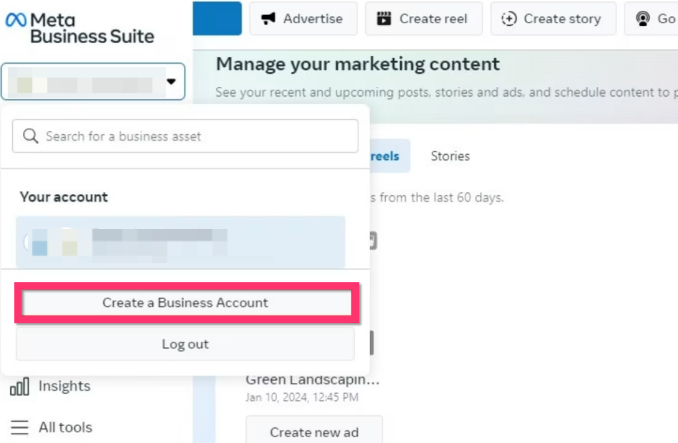
- Type in your business name, personal details, and business email.
- Submit your application.
- Proceed to your business email and confirm by clicking the link sent to you.
Your Facebook Business Manager account is now live!
Step 2: Add Business Assets and People
You can now add your marketing assets, such as your Facebook pages, ad accounts, and even Instagram accounts to your Business Manager account.
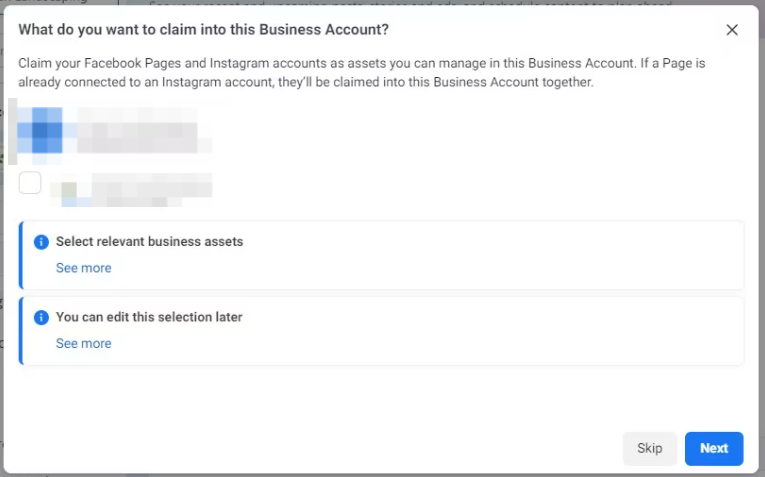
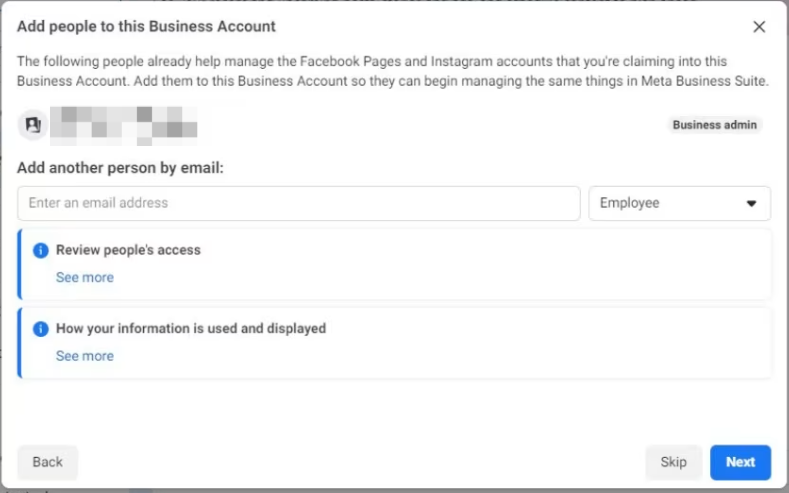
You can also add collaborators to help you manage your business account: employees have limited roles, while business admins have full control of your account. These member roles can be further customised in the 'Business Manager', which we'll mention in the next step.
Step 3: Go To Your Business Manager to Add Your Instagram Account
- Click on 'Business Settings' on the left menu to arrive at a new page with a different interface.
- On the left menu, select 'Instagram Accounts.'
- Claim your Instagram account by agreeing to Meta's terms and logging in to your account.
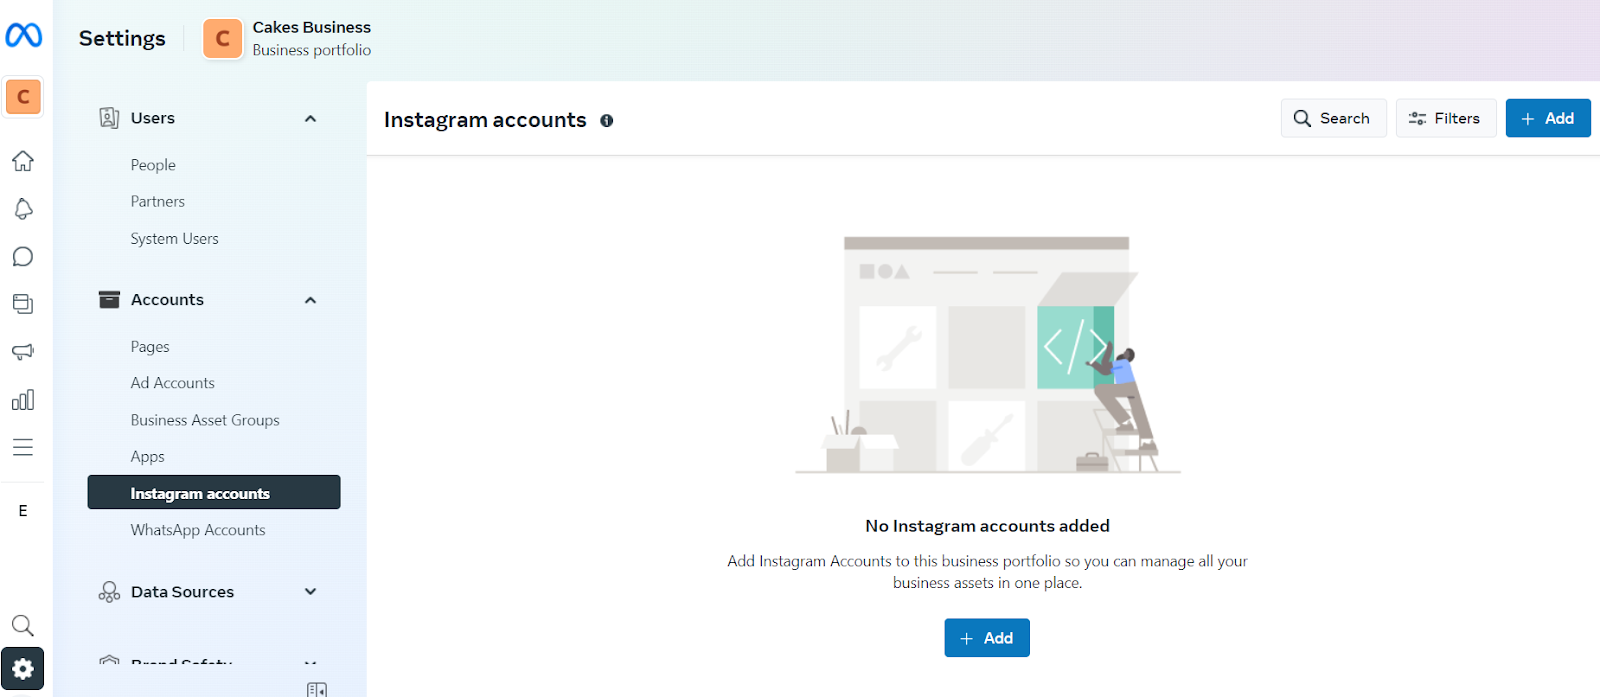
Step 4: Add More Users and Partners
- Under 'Users', click on 'People.'
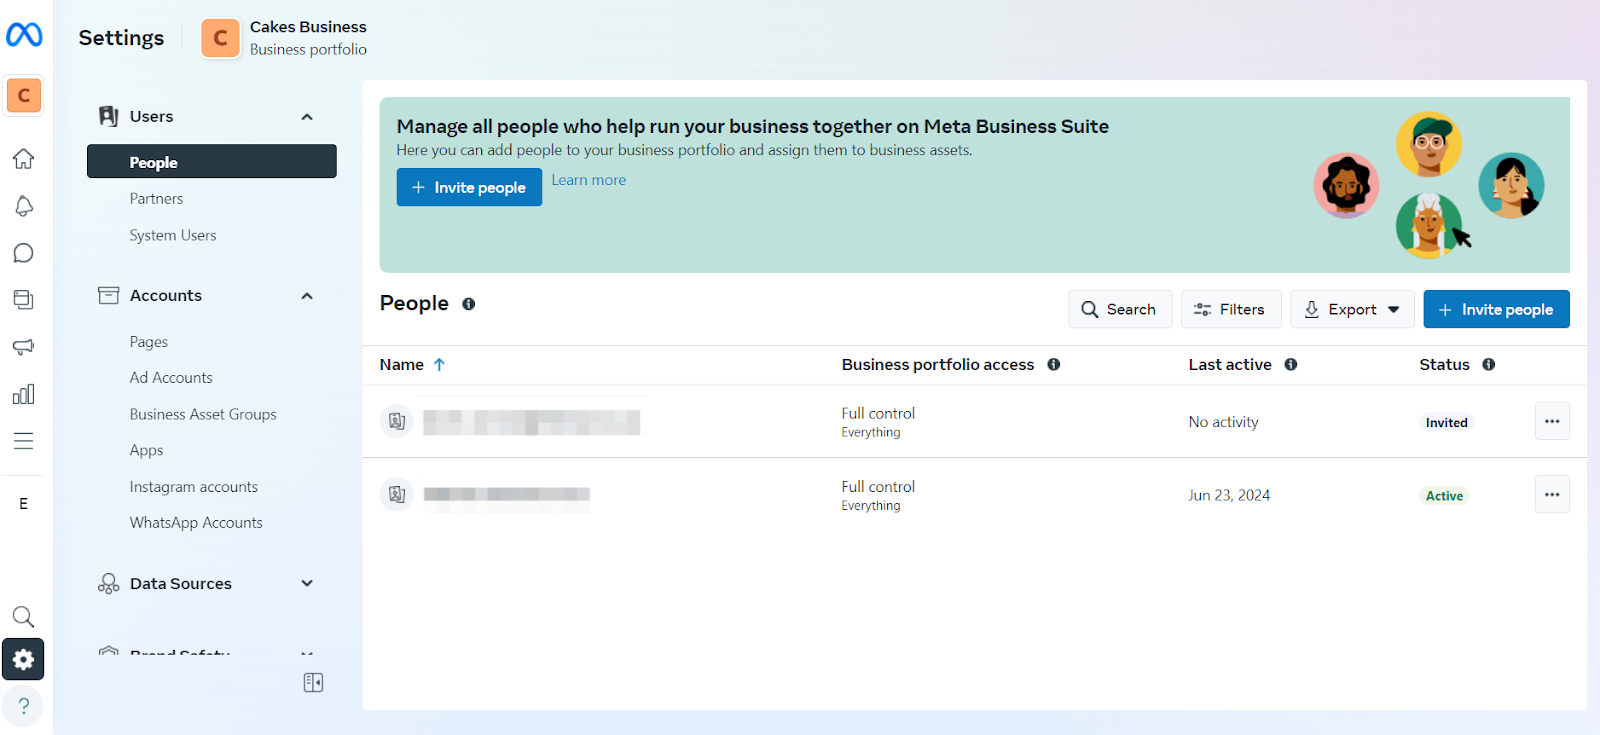
- You can now assign roles and permissions to other users.
- To assign specific permissions, click on the name of the user you want to manage.
- Adjust their access by toggling options like 'Partial access', 'Apps and integrations', 'Full control', and 'Advanced options' as needed.
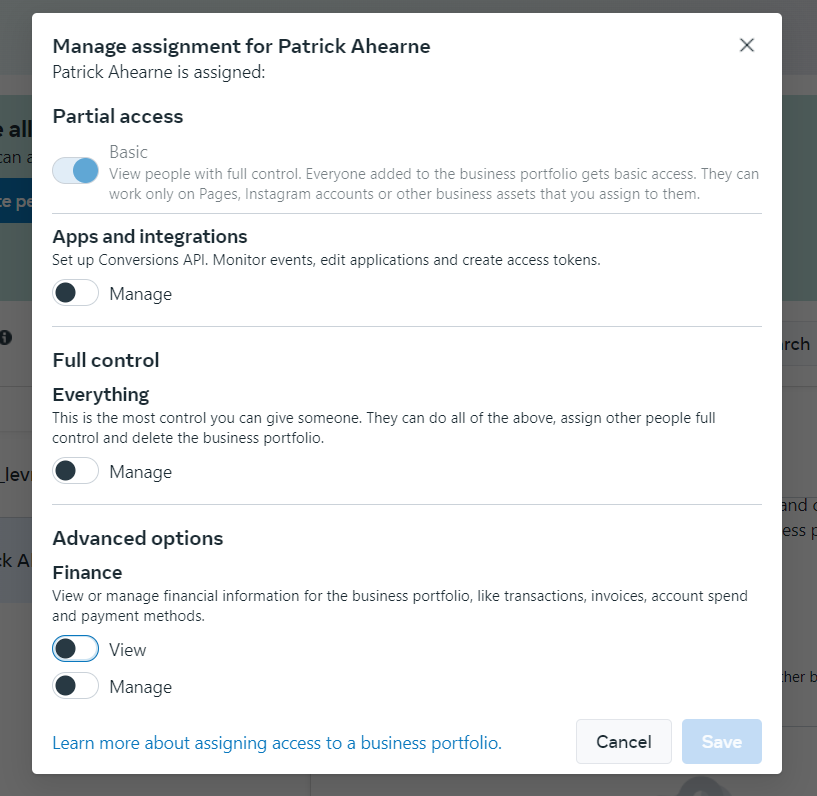
- Click 'Save' to apply the changes.
Step 5: Set up Facebook Pixels
A Facebook pixel is a code you place on your website to track and measure conversions from Facebook ads. This code is generated by Facebook, allowing you to see things like how many people clicked on your ad and then made a purchase, or filled out a lead form.
Even if you haven't started running ads, you'll want to set up Facebook pixels right away. This is because you'll want to start collecting data on your website visitors right away so you can use that data in future campaigns.
- In Business Manager, click on 'All tools' > 'Events Manager.'
- Click the green '+' button.
- In the pop-up that says 'Connect a New Data Source,' choose 'Web' (assuming you're tracking conversions and activity on a website).
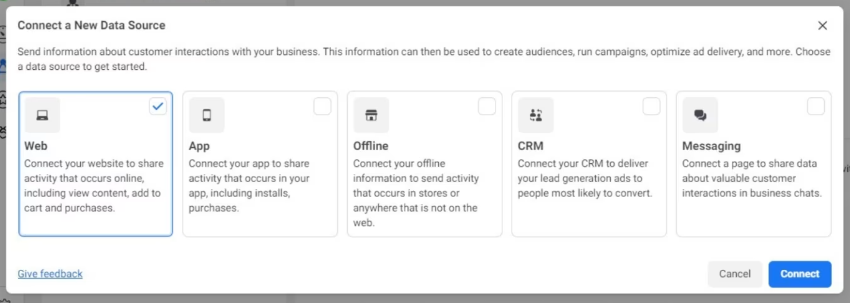
- Enter your website details.
- Select ‘Meta Pixel and Conversions API’ as privacy browser changes are making it harder for Meta's pixel to accurately collect data.
Step 6: Beef Up Your Security With Two-factor Authentication
The Facebook Business Manager is essential for managing your business's online presence. Since it consolidates all relevant elements like ad accounts, pages, and user permissions, it’s crucial to ensure all your assets are well-protected.
To add another layer of security to your account, you can set up two-factor authentication:
- Go to your Business Manager dashboard.
- Select 'Business Settings.'
- Click on 'Security Center' in the menu on the left-hand side.
- Set up your two-factor authentication.
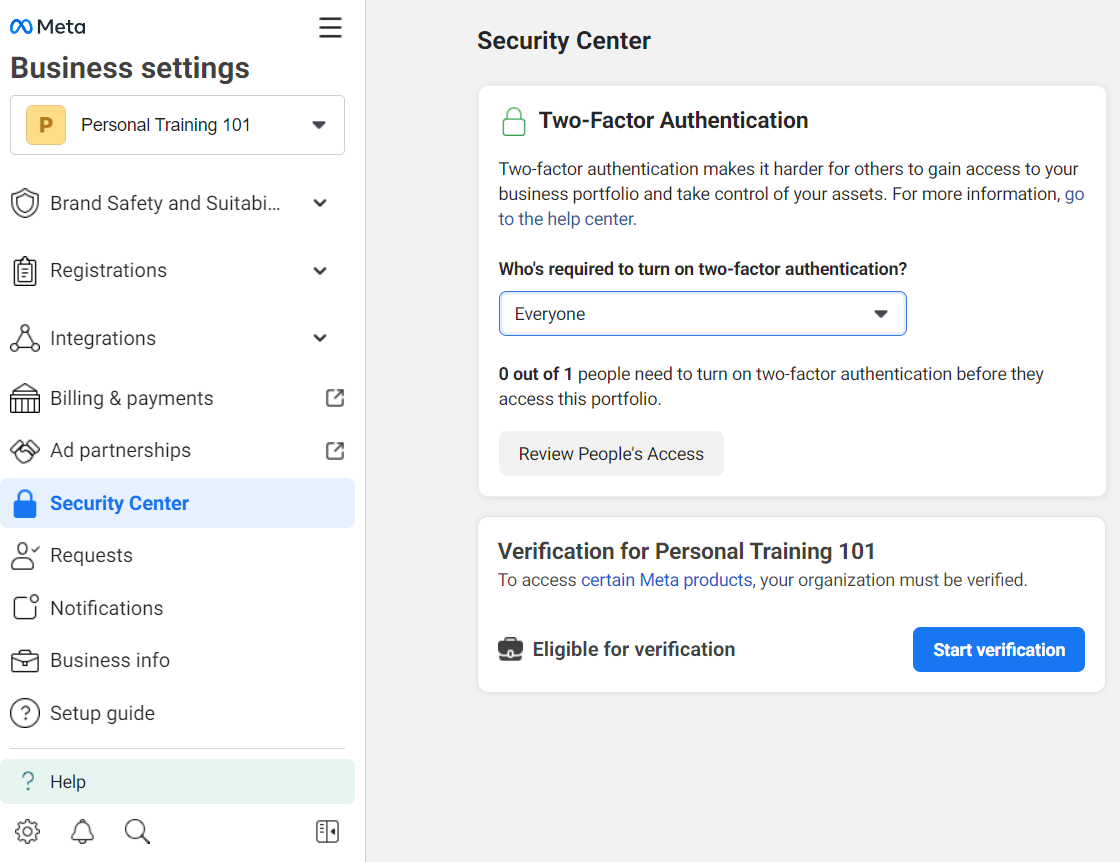
You can also choose required for everyone so that all team members must use two-factor authentication. This step helps prevent unauthorized access and keeps your business information safe.
Tips on How to Use the Meta Business Manager Like a Pro
Use the Project Feature for Proper Asset Organisation
If you have multiple assets, it's easy to get lost in all the pages and ad accounts within your Business Manager. The 'Project' feature allows you to group assets, such as apps, ad accounts, and pages, together for better organization and management. Think of it as creating folders for different parts of your business. For example, you can put related Facebook pages, ad accounts, and apps into one folder (project).
You can also add your Instagram accounts to these folders.
You can organize these folders by location, like 'New York Office' or 'London Branch', or by any other way that makes sense for your business. This way, you can easily give the right people access to the right folders without giving them access to everything else. It keeps things neat and simple.
Use the Locations feature if You're Operating in Multiple Areas
If your business or the business you're managing operates in multiple locations, then the 'Locations' feature is a must-use. This handy tool lets you create individual pages for each location under one main page, keeping everything neatly organised and consistent. You can tailor content and ads for each location, track visits, and give local managers the right level of access without compromising your business asset's overall security.
To acess this feature:
- Select 'Business Manager' located at the top of your page.
- Under 'Assets', click 'Shop Locations.'
- Under 'Manage Business' click 'All Tools'>'Shop Locations' and 'Stores'. You can then manually add your stores or use the bulk upload option for multiple locations.
This feature lets you target local audiences, making them feel like they are receiving individualised attention from your business. It also helps with accurate reporting by tracking performance at each location separately.
Frequently Asked Questions about Meta Business Manager
How to access Facebook Business Manager?
Users can log into their Facebook Business Manager by going to business.facebook.com in their desktop browser. This URL address can also be used to log into the Meta Business Suite or Business Manager.
What is Facebook Business Manager called now?
Facebook Business Manager is now called Meta Business Manager. It was rebranded when Facebook changed its name to Meta in 2021. This change reflects the expanding scope of the platform beyond just Facebook, including other social media networks like Instagram and WhatsApp.
Is Facebook Business Manager the same as Meta Business Suite?
Not quite. The Meta Business Suite acts as the front-end interface for businesses, where you can handle posts and messages and gain insights for Facebook and Instagram. On the other hand, Facebook Business Manager (now Meta Business Portfolio) focuses on backend administrative tasks such as managing ad campaigns, user permissions, and assets like pages and ad accounts.
Both platforms play different roles but are interconnected, making them necessary for a successful Facebook marketing strategy.
Why do I need a Facebook Business Manager account?
It's all about organization and control. Facebook Business Manager lets businesses manage all their assets, pages, ad accounts, and permissions in one place. This allows for better oversight and coordination between team members and more efficient management of ad campaigns across multiple social media platforms.
What happens if I delete Facebook Business Manager?
Users cannot delete their Facebook Business Manager. Instead, Meta will remove the user from their Facebook Business Manager, limiting access to any pages or ad accounts assigned to them. It is not recommended to delete your Facebook Business Manager account as it is crucial for managing and tracking your social media marketing efforts on Meta platforms.
Are there any alternatives to Facebook Business Manager?
Yes, there are alternative tools and services that can help with managing business accounts on Meta platforms. Some popular options include Hootsuite and Sprout Social, which offer comprehensive social media management features such as post-scheduling, analytics, and team collaboration. However, Facebook Business Manager remains the primary platform for businesses to manage their presence on all of Meta's social networks.
.png)

.webp)

.webp)


.webp)
.webp)